Hello CUDA!
Introduction
CUDA is a parallel computing platform and application programming interface model created by Nvidia. It allows software developers and software engineers to use a CUDA-enabled graphics processing unit for general-purpose processing – an approach termed GPGPU.
CUDA programs are compiled using NVCC. NVCC is included with CUDA toolkit.
Building Blocks
Block
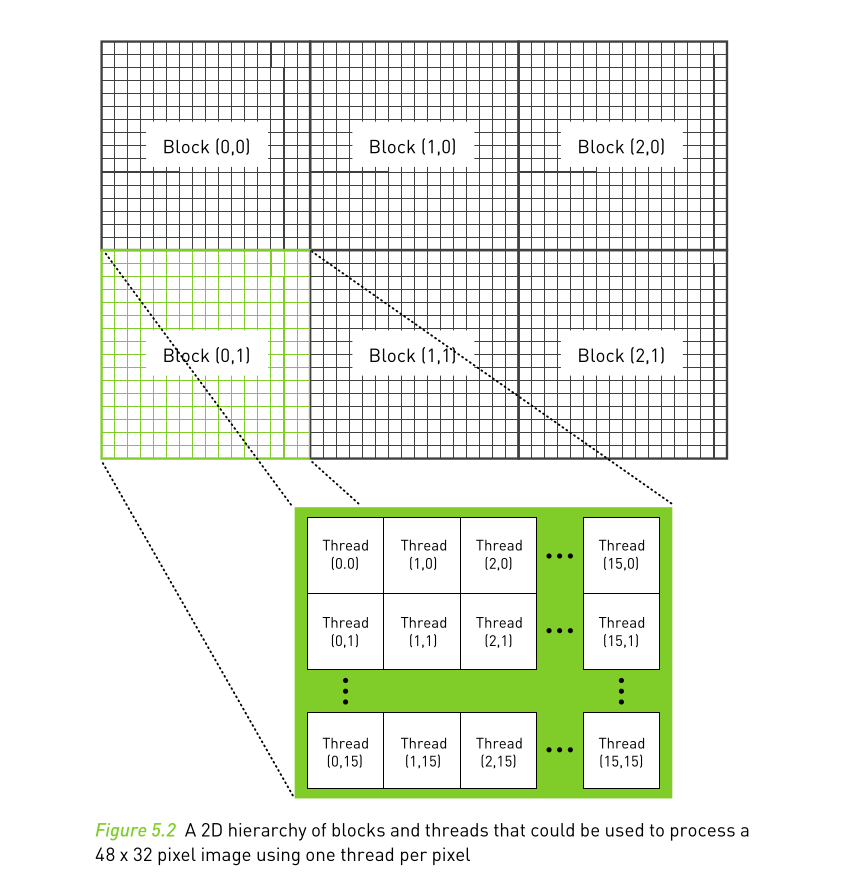
A group of threads is called a CUDA block. CUDA blocks are grouped into a grid. A kernel is executed as a grid of blocks of threads
Thread
Total no of Threads = No Blocks x Threads Per Block
Hello World
Demonstration and code walkthrough of a simple Hello World program.
To run this, clone the repository and run make command.
#include<stdio.h>
#include<stdlib.h>

__global__ void from_gpu(void){

    printf("%d, %d\n", blockIdx.x, threadIdx.x);

}

int main(){

    from_gpu<<<10, 10>>>();
    cudaDeviceSynchronize();

    return 0;
}
Output:
0, 0
0, 1
0, 2
0, 3
0, 4
0, 5
0, 6
....
....
....
7, 5
7, 6
7, 7
7, 8
7, 9
Vector Addition
To demonstrate the power of CUDA, let’s take vector multiplication as an example.
This example has 2 files:
#include <iostream>
#include <random>
#include <vector>
#include <algorithm>

#include "vec_add_k.cuh"

int main(){

    std::vector<int> a(100), b(100);

    std::generate(a.begin(), a.end(), [&](){ return std::rand() % 10; });
    std::generate(b.begin(), b.end(), [&](){ return std::rand() % 10; });

    int *result = add_vec(a.data(), b.data());

    for (int i = 0; i < 100; i++)
    {
        std::cout << a.at(i) << "+" << b.at(i) << "=" << result[i] << std::endl;
    }

    return 0;
}
In vec_add.cpp, 2 vectors are defined and are filled with random numbers. These two vectors are then passed to CUDA kernel for computation.
CUDA Kernel
we start by importing standard library
#include <iostream>
create a function called add_vec this takes in the vector from our program vec_add.cpp
declare variables for device storage. (d_a, d_b, d_c)
to store the result, declare a variable c and allocate memory.
int* add_vec(int *a, int *b){

    int *d_a, *d_b, *d_c;
    int *c;
    c = (int*) malloc(sizeof(int) * 100);
compute the size of storage required, Note that we generated 100 randoms numbers each in both vectors.
int size = 100 * sizeof(int);
allocate memory to device variable’s using cudaMalloc()
    cudaMalloc(&d_a, size);
    cudaMalloc(&d_b, size);
    cudaMalloc(&d_c, size);
Copy host variables into device variables:
    cudaMemcpy(d_a, a, size, cudaMemcpyHostToDevice);
    cudaMemcpy(d_b, b, size, cudaMemcpyHostToDevice);
    cudaMemcpy(d_c, c, size, cudaMemcpyHostToDevice);
Finally Launch the kernel:
add_vec_cuda<<<1, 100>>>(d_a, d_b, d_c);
the numbers inside the triple arrow i.e <<< and >>> define the size of the kernel, the above line will launch 1 block with 100 threads.
__global__ void add_vec_cuda(int *a, int *b, int *c){

    int index = blockDim.x * blockIdx.x + threadIdx.x;

    if (index < 100){
        c[index] = a[index] + b[index];
    }

}
This is where the magic happens, the result of the addition of vector(s) can be calculated independent of other elements in the array. Taking advantage of massive no of Cuda cores and threads, operations like these can be accelerated many times compared to a typical CPU.
index can be calculated like below:
int index = blockDim.x * blockIdx.x + threadIdx.x;
This is one of the main limitations of CUDA, things work a lit bit differently inside CUDA kernel.
 (Source1)
if condition is used to prevent memory overflow, this can be useful in the case of variable input size.
Complete code:
// vec_add_k.cu

#include <iostream>

__global__ void add_vec_cuda(int *a, int *b, int *c){

    int index = blockDim.x * blockIdx.x + threadIdx.x;

    if (index < 100){
        c[index] = a[index] + b[index];
    }

}

int* add_vec(int *a, int *b){

    int *d_a, *d_b, *d_c;
    int *c;

    c = (int*) malloc(sizeof(int) * 100);

    int size = 100 * sizeof(int);

    cudaMalloc(&d_a, size);
    cudaMalloc(&d_b, size);
    cudaMalloc(&d_c, size);

    cudaMemcpy(d_a, a, size, cudaMemcpyHostToDevice);
    cudaMemcpy(d_b, b, size, cudaMemcpyHostToDevice);
    cudaMemcpy(d_c, c, size, cudaMemcpyHostToDevice);

    add_vec_cuda<<<1, 100>>>(d_a, d_b, d_c);

    cudaMemcpy(c, d_c, size, cudaMemcpyDeviceToHost);

    cudaFree(d_a);
    cudaFree(d_b);
    cudaFree(d_c);

    return c;
}
What’s Next?
This post serves as an example-first intro to CUDA, I skipped a lot of jargon about CUDA and NVIDIA architecture. I intend to cover some important topics like Matrix Multiplication and Image processing in future articles :bowtie: